

How to take in a pair of shorts/pants in the waist.
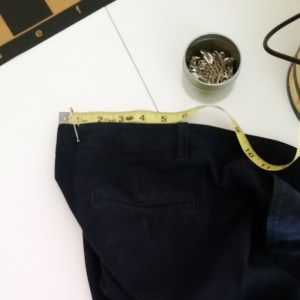
- Measure how much you want to take in from the shorts. We’ll be separating a section of the waistband from the body of the shorts, taking each in separately, and rejoining the section at the end. In this case, I pinched the shorts in the very middle of the back, and pinned them when it felt like they were hitting me comfortably: 2″ total (1″ on each side of the fold).
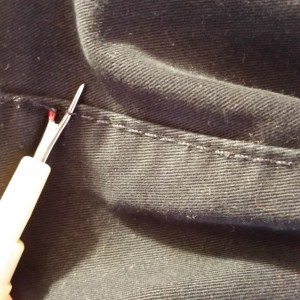
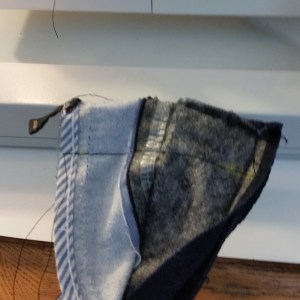
- Using a razor or a seam ripper, remove the center back belt loop. If you’re using a razor, gently ease it between the waistband and the body of the shorts. You want to cut stitches, not the fabric! Work the razor gently between layers to the left and right of the center back seam, about 4″ to give yourself plenty of room to make a new seam.


- Is there extra stitches in the back of your shorts (top-stitching or a flat-felled seam)?With a seam ripper, unpick the top stitching of the center back seam, almost all the way to the middle of the shorts where the seams meet. Otherwise it may not be even when you take it in. If your garment doesn’t have top stitches, skip this step
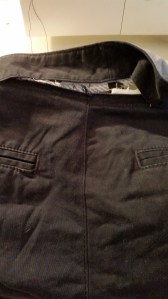
- Now fold your shorts in half along the center back seam, from the inside [pics]. The two halves should lay evenly, because you’ve removed any extra stitching.


- Pin the two sides together, and use chalk to mark how much you’re removing (1″ in my case). Use a hip curve (or eyeball it!) to create a smooth line from your new mark to somewhere lower down on the center back seam. The longer this line is, the more gradual the curve, and the less noticeable the alteration will be. This will be your new center back seam.


- Time to sew! Stitch along this new line you just drew. If you’re worried about fit, machine baste it first, then try on the shorts to test. If you like how they fit, trim away the excess fabric along the seam to a new seam allowance (follow whatever the rest of the shorts have). Press the seam flat with an iron in the same way that it was before you altered.


- If your shorts had top-stitching like mine, turn the shorts right-side-out and re-stitch the top-stitching.
- Now to alter the waist band! With a seam ripper, remove the top-stitching from the very top of the waist band.


- Now you should be able to lay the waistband flat, and fold it in half along the center back. Pin the two sides together and draw a straight, even line to match the first mark you made on the shorts (1″ in my case). Stitch along this line. You might also want to baste this, and check to make sure that your center back seam on the waistband matches the one on the body of your shorts.
- Trim away the excess fabric, leaving a seam allowance, fold the waistband right side out, and press with an iron into the correct shape. Re-stitch any top-stitching.


- Right sides together, line up the waistband with the body of the shorts. Make sure the center back seams line up, and stitch together. Make sure you catch the edges of where you cut with a razor, so the waistband doesn’t continue to unravel!


- On the right side of the shorts, use pins to catch the inside of the waistband, and stitch in the ditch to catch the inside of the waistband. Trim any extra threads, press with an iron, and you’re done!

Send me a message if you have any questions about anything I’ve mentioned!
